Using the |
 |
|
Spreadsheet Tool |
You can use the Spreadsheet Tool to document (or log) signing activity for every document signed. Even multiple types of documents and in multiple Excel workbooks.
Such a log can contain any amount of data from each document signed, and can also record where the resulting signed document was stored (with a hyperlink directly to the document!).
The key to the Spreadsheet tool's power is the CursiVision Data Fields concept. To see how to define Data Fields, please visit Using the CursiVision Data Fields.
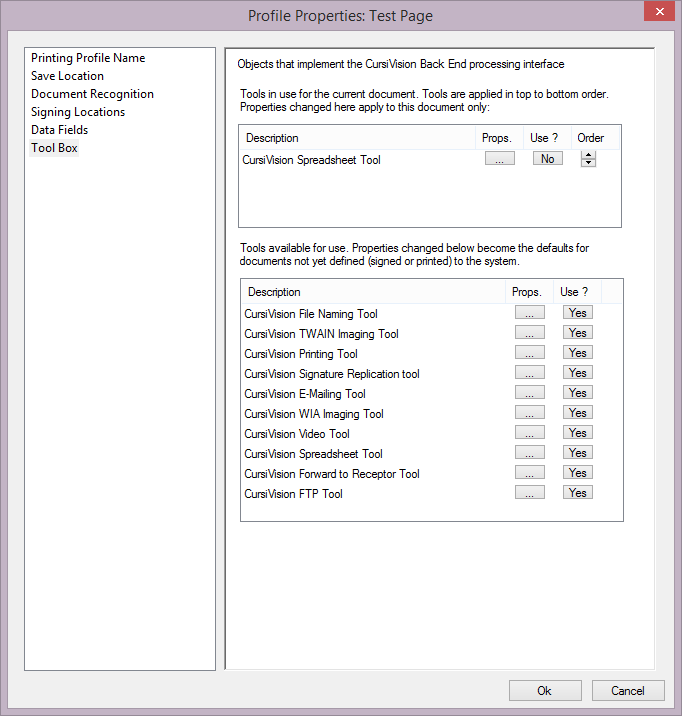
Once you have fields defined, visit the document or print profile's settings page, and choose "Tool Box" on the left side of the properties window, you will see Figure 1.
|
| Figure 1. The Tool Box selection, with the Spreadsheet tool ready for use. |
Recall that you can find the print profile by selecting Global Properties - then "Print to sign", find the profile in your list of profiles, and click Settings beneath the profile list.
Note that the Spreadsheet tool is selected into the upper list of tools. Any number of other tools could be put in the upper list by selecting "Yes" in the tool's instance in the lower list.
Did you know that each of these tools can be in the upper list multiple times ? You could, for example, log the signing activity for your documents into multiple spreadsheets, each containing different data from the document.
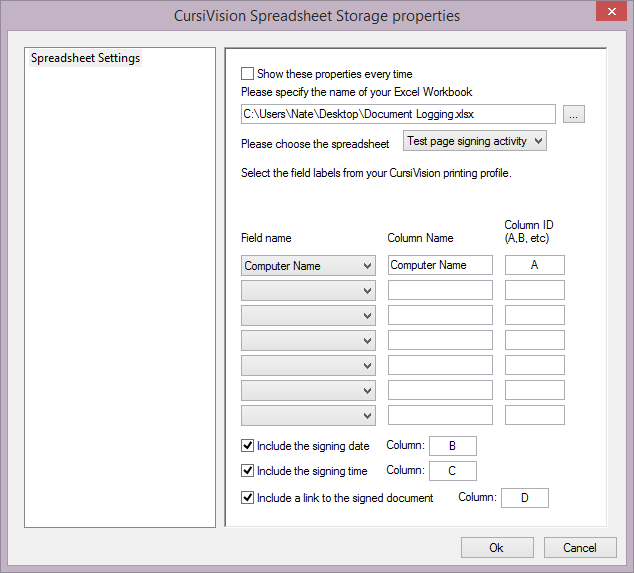
Figure 2 shows the settings for the Spreadsheet tool, arrived at by clicking the "props" button on the appropriate item in the upper list of Figure 1.
|
| Figure 2. The Spreadsheet tool properties |
You could create "global" settings for the Spreadsheet tool by clicking the "props" button on the lower list. If you do this, merely place the Spreadsheet tool into service for each print profile or document settings, and that instance will carry forward the settings from the global instance of the spreadsheet tool. If, however, the global settings change in the future, you would want to "un" use and then re-use the spreadsheet tool into your particular documents for them to "see" the new settings. All of the "global" tool instances work this way.
Much of Figure 2 has been filled in with values. In our Data Fields tutorial we created a "Computer Name" data field from the Windows Test Page, here is where we put that data field to use.
In these settings, you specify the name of an existing workbook, choose any spreadsheet from that workbook, then proceed to map the data fields defined onto columns in the worksheet. You simply indicate into what column, using standard Excel ABC notation, where the data from the field will be placed. The tool will also label each column with the value to the right of the data field selection in Figure 2. This label can be anything, or left blank.
While providing these properties - you can go back to the Data Fields page to create new fields if you need to. Then, upon re-visit to the Spreadsheet properties page, those fields will be ready to use.
You can also log the date, time, and document save location of the document as well, simply indicate the column into which these values should be placed, we are using columns B, C, and D.
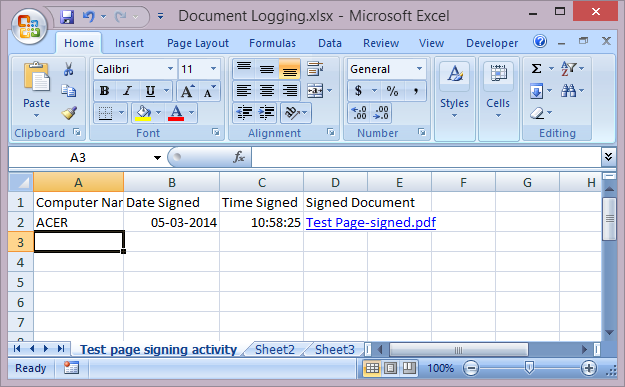
That is all there is to it! Note in Figure 3 we show the results after signing our Windows Test page whose print profile settings we have setup through these examples. Remember that this is also completely automatic - once the Spreadsheet tool is setup, no action is required on anybody's part, the data simply logs into the spreadsheet in the background.
|
| Figure 3. Our example logged into a spreadsheet |
We also note that there is an issue with Excel that users should be aware of. First - the Excel workbook should not be opened by anybody on the network during the time CursiVision needs to put data into it. The exception to this is that it can be open on the computer where the signing is taking place. However, in that case, if Excel is in a command state - it is also not possible for the Spreadsheet tool to add the data. What we mean by command state is if the user is actively doing something and Excel is waiting for the user's next response. You can tell when Excel is in this state because the main menu strip appears disabled. Try clicking in the Excel formula edit box to enable it, and you will see an example. Excel does not participate in software integration while in this state.
Usage instruction for other tools from the CursiVision Toolbox can be seen here:
- File Naming tool
- Imaging (scanner) tools
- Printing tool
- E-Mail tool
- Webcam tool
- Forward to Receptor tool
- FTP tool
- Generic tool