Using the |
 |
|
File Naming tool |
You can take content from your signed documents and name the resulting electronic document with that content.
This tool is essentially enabled via the CursiVision Data Fields concept. To see how to define Data Fields, please visit Using the CursiVision Data Fields.
Once you have at least one field defined, visit the document or print profile's settings page, and choose "Tool Box" on the left side of the properties window, you will see Figure 1.
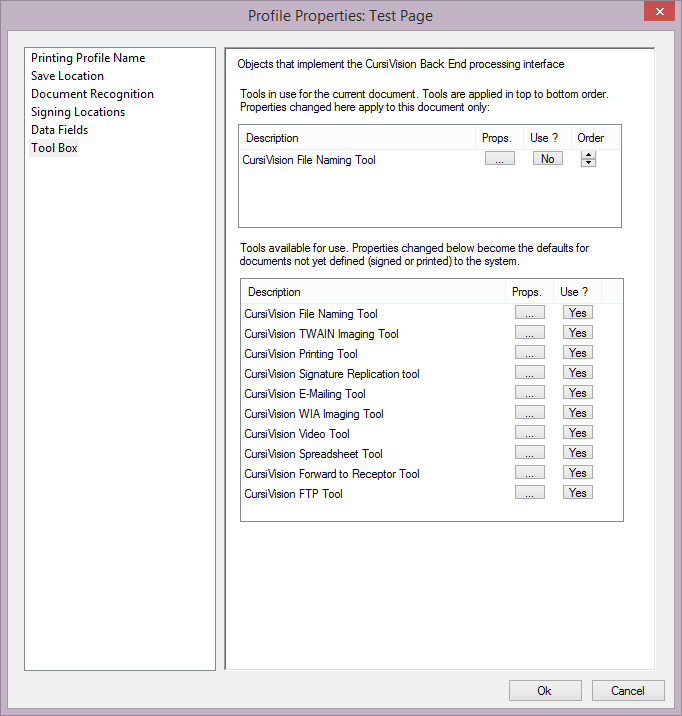
|
| Figure 1. The Tool Box selection, with the File Naming tool ready for use. |
Did you know that you can have multiple instances of any tool in the upper box ? You could save several files out of the original signed document providing multiple copies - to perhaps different departments - which differ only by name - and all of which take that name value out of that actual document.
To set the properties for the File Naming tool - click on "Props" in the row for the tool in the upper list. You will be presented with Figure 2.
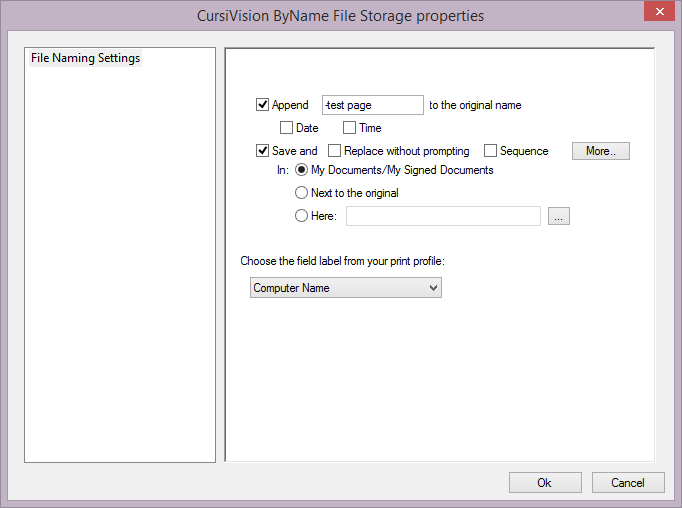
|
| Figure 2. File Naming tool properties |
The majority of the above figure simply repeats the standard CursiVision document saving options. Note that we have already selected the appropriate Data Field from our print profile Data Fields. In our Data Fields tutorial we created a "Computer Name" data field from the Windows Test Page, here is where we put that data field to use.
Speaking of the standard CursiVision document saving options, one of the property pages for each document or print profile is where and how to save the document (the "Save Location" category). When using this tool, and others, note that you would probably turn OFF file saving altogether in that category because you are saving the document through the use of this tool. To turn off file saving, simply click off the "Save and" checkbox, you will note that all the other fields then become disabled through irrelevance.
The other values in the figure indicate where and how we will use the data field value to "embellish" the name of the resulting file and where on the local drive or network we will put that file.
In our examples, the Computer Name field will contain the value "ACER" - thus, our file will be saved as follows:
My Documents\My Signed Documents\ACER-test page.pdf |
If we were printing invoices, and storing the resulting signed copies, we could save the resulting document with the actual invoice number as the full name of the document. That would make finding that signed invoice on the computer as easy as it could possibly be. For that matter, we could save the document twice, once on one location, and again in sub-directories off of that location with names indicating the month, day of month, and year (the More... option in Figure 2). That way, if you don't know the number, but the date the invoice was signed, you could find it that way. Carried even further - why not take the customer's name directly off the invoice and save the file with that as the root name?
- Imaging (scanner) tools
- Printing tool
- E-Mail tool
- Webcam tool
- Spreadsheet Logging tool
- Forward to Receptor tool
- FTP tool
- Generic tool