Navigating the |
 |
|
Signing locations |
With CursiVision, you can write anywhere on the document.
CursiVision remembers (as an option) where a document is signed and presents those locations to the signer the next time.
With the TabletPC, it is necessary to allow both document navigation and writing, though they are separate activities in order to not confuse scrolling and zoom gestures with the act of writing.
Because of this, CursiVision is usually in one of two modes, Navigation and writing.
This section discusses how you switch between modes as well as how to use the "pre-recorded" signing locations in an easy manner.
When CursiVision is NOT using previously remembered signing locations
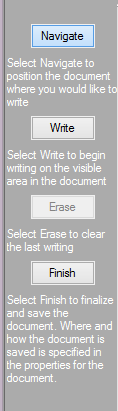 |
If you are writing on a document every now and then, or you don't otherwise desire to set up a process for the document, you can use simple navigate and sign. Opening such a document, or printing it through the print driver, you will see control on the left Sidebar, as in Figure 1. These are for documents or print profiles where the "Remember Signing location" has been turned off. In Figure 1, you can see how to switch between navigating the document, and placing handwriting within it. Once you click Navigate - you are free to scroll up/down, or zoom in or out, until you find the place where you want to write. Then, click Write - and you can begin writing. You can do this until you click Finish to save and finalize the document. Any selected tools from the toolbox configured for use with the document will be applied before saving it. If you want to clear one of the "sessions" into which you wrote, you can select Erase. The system will not erase handwriting after you select Finish. |
| Figure 1. Adhoc writing on any document |